
So you know for sure you want to go backpacking. Maybe you were inspired by a friend, a movie, or a breathtaking Instagram post. But no matter what, you’ve decided to go, and that’s awesome.
But where do you go? You might have already figured out what gear you need to bring, but choosing a trail can be a little bit intimidating. Where do you find trails? How far should you go? How hard will it be?
Thankfully, these are questions that can be answered pretty easily with a little bit of help and practice. Read on for the exact knowledge you need to be able to pick the right trail for success on your first backpacking trip.
Note: As an Amazon associate I earn from qualifying purchases. If you click through one of the links on this page and make a purchase, we receive a small commission at no extra cost to you. It helps keep us up and running and able to continue to provide great content. 🙂
How To Find Trails Near You
When I first started backpacking, I just knew I wanted to do it. I didn’t have many friends that were into it, and all my hiking experience was on “no camping” type trails. This led to some confusion on my part as to where exactly I could go.
Luckily, I had seen an Instagram post from a friend who hiked to a local lake a couple weeks earlier, so I made that my destination. It doesn’t have to be that lucky, though, and I have since found some great, simple resources for finding hiking trails.
- Alltrails
- Local Facebook groups
- Local Guidebooks
- Outdoor blogs
- Hiking Project from REI (my personal favorite)
For some extra ways to find more (and better) trails, check out my post on the 9 Best Apps for Hiking.
Alltrails is a very popular website for finding hiking trails. It probably has the biggest database of any site out there, but in my opinion it’s not the most user friendly option for people specifically looking for backpacking trails (it seems to be geared toward day hikers). It does have an app with downloadable maps (if you get the premium version) which can be nice for some.
Local facebook groups can be awesome resources for finding local tips and trips that aren’t as well known. I’m a member of a couple North Idaho hiking pages and regularly get inspiration from them. The issue with facebook is that the information on the hike won’t be nearly as comprehensive as you probably need as a beginner.
Local Guidebooks
Local guidebooks can be great, and I love my local book, 100 Hikes in the Inland Northwest. It gives detailed route descriptions and I’ve done amazing hikes in there that I’ve never seen listed anywhere else. If you have a hiking guidebook local to your area, I’d definitely recommend buying it.
Of all the options, Hiking Project from REI is currently my favorite resource for finding backpacking trips for a few reasons.
The first is that there are tons of trails. In the image below, each one of those little lines is a trail. The map interface also makes it really easy to see where trails are in relation to you and approximately how long they are.
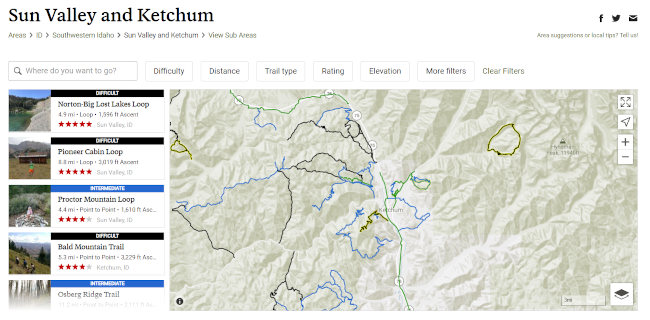
The second is the level of filtering. You can filter first by location, then by difficulty, distance, trail type(singletrack, wide trail, or paved), rating(1-5 stars, as reviewed by other hikers), elevation and more. Trails on the map are also color-coded by difficulty, so it’s super easy with hiking project to find the exact trail you want for whatever kind of hike you’re looking for.
The third is that it’s very hiker focused. There are active communities all around the country who post trips, rate trails, and comment with valuable info. There are also forums where people often communicate about topics relevant to their region. The site is basically a one stop shop for hiking trail information.
How To Choose A Trail
Alright, so you know where to find some trail options. Next you need to choose one that’s right for you. When deciding on your first trip, my first big recommendation is that you just do a simple overnighter. You can always expand after that, but an overnight trip will allow you to get a feel for backpacking while still being close enough to the car in case you have any major issues (one really cold night isn’t fun, but two really cold nights is horrible).
Then there are three key components of the trail to consider:
- landscape type
- distance
- elevation
Landscape Type
When I say landscape type, I’m talking about whether you’ll be hiking in the mountains, plains, desert, etc. The type of landscape also takes into account how much water will be available.
When it comes to landscape, try to stick to terrain you know (don’t choose the desert as your first trip if you’re used to dense forest). I also advise that you pick a well established and well graded trail (no rock scrambling) and one with a lot of available water. That will take water planning (mostly) out of the equation, and you won’t have to worry about the trail being too technical to handle or too difficult to follow. If you’re looking at a trail description on Alltrails, Hiking Project, or a guidebook, it should tell you how well maintained/signed the trail is and give you water availability info.
Distance
Distance depends somewhat on how well conditioned you are and how often you day-hike, but I’d suggest no more than about 6 or 7 miles per day. That’s enough to push you a little bit while leaving in plenty of margin for error and time to enjoy the views.
On a trails website or guidebook, hike distances will be listed either as “out-and-back,” "loop," or “one-way” (sometimes called "point-to-point" also). Out-and-back mileage is the total mileage from the trailhead to the destination point and back. So if you plan to camp at the destination point, your per-day mileage will be half the number of miles listed. Loop mileage is the total distance of a loop, starting and ending at the trailhead. For loop hikes, you'll have to look at the map and pick a good spot to camp about halfway along. If the mileage is listed as one-way, that number is your daily mileage, and you'll return along the same trail on the second day.
*Note about loops:* "Loop" should mean what you think it means: that the hike is one continuous loop, never repeating the same section of trail but returning to the same trailhead. Sometimes it means that, but I've found that for whatever reason many hikes (far, far too many) listed as "loops" are just "out-and-backs." You'll just have to check the map and make sure you understand what it actually means.
Elevation
In reference to backpacking, elevation can mean two things: altitude, meaning total elevation from sea level, and elevation gain, which is how much you’ll climb while hiking.
For altitude, don’t pick a trail that’s too much higher than where you live. For most people this shouldn’t be a problem, but if you live somewhere like Colorado, Central California, or Western Washington, take care that your chosen trail isn’t 4000+ feet higher than you live. You’ll definitely feel the lack of oxygen. Altitude is also important when it comes to choosing a good date to hike. Even mountains only a couple thousand feet higher than where you live can hold snow months longer than it lasts in town (see our mid-july JMT hike for an extreme example).
For elevation gain, it’s important to not overestimate yourself. The extra weight of the backpack makes every foot of gain feel like five. My first backpacking trip ever we gained 2,900 feet in 6 miles (at least I got the distance right) and at the top my legs were pure jell-o. It was worth it, but had I known how hard it would be I wouldn’t have picked that trail. I suggest you stick to something with less than 1,000 feet of total elevation gain (roughly 100 flights of stairs), and if you feel like that could be too much go with 400-500. You should challenge yourself a little, but you don’t want to ruin the experience.
Estimating Time on Trail
Time on trail is an important thing to consider. You have to have enough time to do your hike and still enjoy the trip, so think about how long it will take you and adjust if you need to.
In my experience, an average hiker with a backpack gaining 100-150 feet per mile will do about 1.5-2 miles per hour. Add in some buffer and break time, and this means you’ll be on trail for around 6 hours. For people who don't hike all the time that’s a long hiking day, so if you feel like it could take you longer than that (or if you don't want to hike for that long), reduce your elevation gain or distance to make it a little bit more comfortable.
When you have your itinerary planned, write it out and give it to a friend or family member. Tell them when you plan on being back, so if for some reason you have issues there will be someone to come help you out ASAP.
Hiking Project Walkthrough
All of the above should be enough information to get you going. But I thought it would be valuable to do a quick walkthrough of how to find a hike on Hiking Project to show my process for finding new trails.
When you go to the Hiking Project homepage, you'll be prompted to enter a location. For the purposes of this walkthrough, I chose the Ketchum/Sun Valley area (somewhere I'd like to hike soon). When you search a location and choose an "area", you'll be shown this screen.
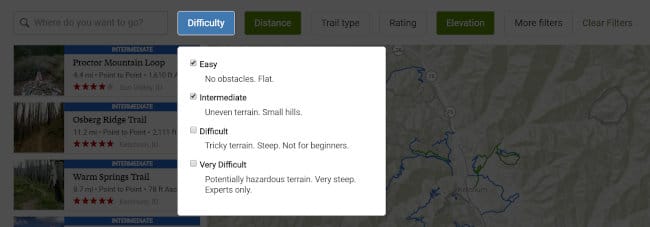
From there you can filter trails however you want to, and the filtered results will show up on the left side.

Note that 'Elevation' is referring to altitude, and not elevation gain or loss. For that, you'll have to look at the individual page for each trail.

For difficulty, definitely exclude 'Very Difficult' for your first trip. What 'Difficult' means can vary depending on who posted the trail originally, so if you want to include that, you can. Just analyze the trail description and reviews and make sure you're not getting in over your head. If there are no reviews, don't choose a trail marked 'Difficult', because there's a chance it's more like 'Very Difficult.'
Choose a Trail
From here you can choose a trail from the options on the left. You'll be able to scroll through them, and each will tell you the type of trail, distance, elevation gain, and a star rating. Pick one that looks good to you. When you click through, you'll end up on the trail page, which tells you everything you need to know about it.
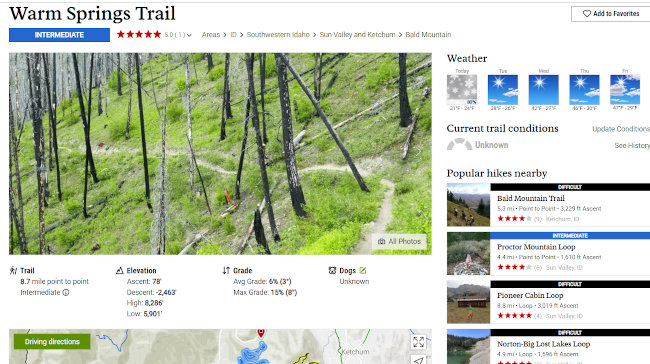
The trail profile page gives you all the information you need to decide whether or not you want to hike that trail. You can see trail type, distance, high and low points, ascent and descent (keep in mind that if ascent is low and descent is high you'll be climbing on the way back) and average grade (6-10% is pretty average, anything over 15% is steep). You also get overview maps, driving directions, and reviews and photos from other hikers.
Of course, you don't have to use Hiking Project to find a trail, but it's a really user friendly way to do it. If you already have a trail in mind or have had one recommended to you, just evaluate it based on the criteria above. If it looks good, go for it!
When you choose a trail, make sure you bring paper maps and know how to use them. Often the trail description will give you the USGS map section, which you can then download and print out for free at the USGS website, or on the National Geographic maps site (if the map section isn't listed, you can also use either of these tools to find the neccessary maps as long as you know the rough location). The GAIA GPS iPhone/Android app is also a convenient way to view maps, just don't rely on it 100%.
Any questions? Ask away in the comments.