
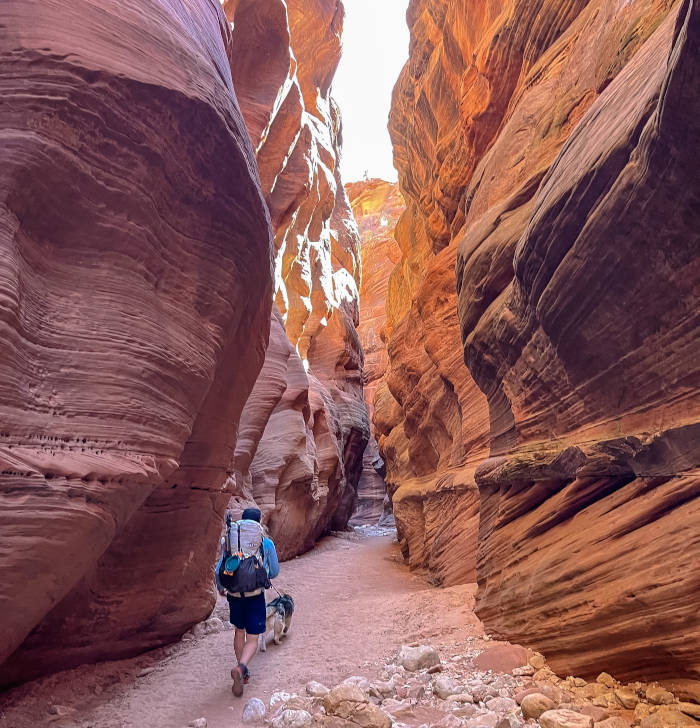
If you’re looking for a single southern Utah backpacking trip that will showcase the best of what the area has to offer, then Paria Canyon/Buckskin Gulch is the trip for you. Located in the Paria Canyon-Vermillion Cliffs Wilderness, this hike follows a wild river (and/or narrow slot canyon) for at least 38 miles. It cuts its way through massive red Navajo sandstone walls that range from 100-500 feet high, and Buckskin Gulch (should you choose to hike it) gets as narrow as 2 feet (!!!).
There is no trail and you’ll constantly be crossing the river, so the going is slow, but it’s totally worth it and the scenery is phenomenal. The fairly restrictive BLM permit process also does its job well to keep this wilderness wild. After passing a few day hikers in the first couple miles of our trip, we only saw one other backpacker, and didn’t see another day hiker or backpacker after entering Paria Canyon from Buckskin Gulch.
In this guide, I’ll go over possible routes and itineraries, how to get permits for this hike, and general guidelines and tips to make your Paria Canyon trip an awesome one. There's a lot here, so if you you're looking for something specific you can find it in the table of contents below.
Note: As an Amazon associate I earn from qualifying purchases. If you click through one of the links on this page and make a purchase, we receive a small commission at no extra cost to you. It helps keep us up and running and able to continue to provide great content. 🙂
Overview
Paria Canyon offers quite a few different options for different styles of hiking, but here are the basics.
Type: Thru-hike (out-and-back is possible, but not recommended)
Distance: 21-47 miles, depending on route
Days needed: 2-5, depending on route
Elevation at trailhead: 4300ft-4900ft, depending on trailhead
Elevation gain/loss: -500 to -1500, depending on route
Permits: Required, competitive during peak seasons
Best time to hike: March-May or September-November
Campfires?: No
Wag Bags?: Required
When is the Best Time To Hike Paria Canyon?
We did this hike in early March, which is technically the “winter” season. While we did benefit from being able to purchase permits only a week or so in advance, this time of year means colder temperatures of both the air and water, and is only recommended if you’re willing to deal with some pretty cold nights (30-40 degrees F).
The best time to hike is either spring or fall. Both of these times will have milder temperatures and fairly low flash flood risk. Summer can be very hot and flash flood risk is generally high, which in the 15-mile Buckskin Gulch (the longest slot canyon in the country) can be extremely dangerous. Winter temps can easily get below freezing, and walking in water all day in the cold isn’t all that fun.
Difficulty
Paria Canyon isn’t difficult due to elevation change or high altitude, but it presents unique challenges that make for slow hiking. First, traveling through Buckskin Gulch requires at least 13 miles of hiking on the first day to get to a campsite. That hiking will either be in sand or loose rock, and there are several boulder jams that require some scrambling. During summer and fall, these boulder jams often have knee-chest deep “cesspools” at the bottom; nasty stagnant water resulting from seasonal rains.
Beyond Buckskin is Paria Canyon, which has no trail and requires you to cross back and forth over the river constantly. It isn’t usually very deep (ankle-knee height, varying seasonally), but it can be very mucky and walking can be challenging. Your feet will be wet the entire hike.
The last challenge is water availability. I’ll get into this more below, but the Paria River (once you reach it) is very silty and slightly saline. It is also downstream from cattle operations, which means that it will need to be fully filtered and purified if you’re going to drink it. Most people prefer instead to rely on natural springs, but there are relatively few of these so effective water planning is essential (more on this below).
Permits
Permits are required for overnight trips and day hikes in Paria Canyon. Day hikers can self-register at the trailhead, but overnight trips are limited to 20 people per day across all trailheads. This makes them very competitive, and in peak seasons permits will fill up nearly as soon as they become available.
Paria Canyon doesn’t use a lottery, but instead makes permits available for reservation on the recreation.gov website at noon MST on the first of each month for reservations three months ahead. For example, all permits for the entire month of May become available to reserve on February 1st, 12:00 noon MST. Here’s a calendar of permit availability for the entire year:
| January 1st | April |
| February 1st | May |
| March 1st | June |
| April 1st | July |
| May 1st | August |
| June 1st | September |
| July 1st | October |
| August 1st | November |
| September 1st | December |
| October 1st | January |
| November 1st | February |
| December 1st | March |
When those permits go live, anyone and everyone can just fill out the form and reserve them. If you’re planning on hiking in peak seasons, you should know exactly when and how many days you want to hike, and be on the reservation website the minute those permits become available.
On the site you’ll be able to see which start days are available and how many slots are left for that day. These slots represent individuals, so if you have a group of 3 people, you’ll need to pick a start date that has at least 3 slots left. Dogs don’t count towards the daily quota, but you’ll still have to pay for them.
The cost for permits is a $9.00 reservation fee, plus $5.00 per person per day (and $5.00 per dog per day, if bringing). That cost is per day, not per night, so any day you will be on trail must be included. Permits must be picked up in-person no more than 10 days from your start date, and you’ll have the option to choose which office you want to pick them up from at checkout.
Possible Routes
To reserve permits, you’ll need to know where you’re starting and finishing, as well as how many days that will take. Here I’ve outlined some of the main route options to help you decide what’s best for you. Keep in mind that all of these options are thru-hikes and will require either a car drop or a shuttle (more on shuttles below). For out-and-backs, feel free to do whatever interests you the most.
Option 1: Wire Pass Trailhead to White House Trailhead
Length: 21 miles
Days Required: 2 days, 1 night
This is the simplest and easiest route that includes Buckskin Gulch. You’ll start at Wire Pass trailhead, which is a 1.7 mile cutoff to Buckskin Gulch that allows you to shorten the distance to Paria Canyon by about 3 miles. Since the entirety of Buckskin is roughly 16 miles from the trailhead to the confluence with the Paria River, shortening it via Wire Pass is recommended. You’ll be able to camp just before or after the confluence of Buckskin and the Paria, and then hike 7 miles north along the Paria to White House trailhead on Day 2. This is a great route because it’s short but action-packed, including most of Buckskin and a section of the Paria Narrows that rivals Zion. While this is the shortest option, there is no reliable water (aside from the Paria River), so make sure to plan for that.
Option 2: Wire Pass Trailhead to Lee’s Ferry
Length: 44 miles
Days required: 4-5 days, 3-4 nights
This is the option we chose when we hiked Paria Canyon. It’s long and challenging, but it allows you to get the full picture of the Paria Canyon system. You’ll start by hiking Buckskin Gulch on Day 1, then following the Paria River all the way from narrows to its wide-open confluence with the Colorado River. The canyon walls are massive, and it cuts through multiple rock layers along the way, making for an incredible look at geologic time. Water planning is still critical, but there are several freshwater springs and tons of awesome campsites along the river.
Option 3: Buckskin Gulch Trailhead to White House Trailhead
Length: 23 miles
Days required: 2 days, 1 night
Starting at Buckskin Gulch makes for a 16-mile first day, but for those who want to hike the entire length of the longest slot canyon in the country (and quite possibly the world), this is the best way to do it. Similar to the Wire Pass-White House route, you’ll start at the top of Buckskin Gulch and follow it all the way down. Adding the additional miles makes water planning even more important, though, and you may need to carry upwards of 8 liters of water if you plan on cooking meals with it.
Option 4: White House Trailhead to Lee’s Ferry
Length: 38 miles
Days required: 3-5 days, 2-4 nights
This route skips Buckskin Gulch, but it’s logistically easier because you’ll have to hike significantly fewer miles before reaching a water source. Skipping Buckskin doesn’t mean you have to miss it entirely though. You can spend a night (or two) at the confluence of Buckskin and Paria, and use that base camp to explore the lower portions of Buckskin with light daypacks. That way you can hike only as far up as you feel comfortable and still get some of that awesome Buckskin experience.
These are sample routes, but you can really do whatever you want. You can do any of these routes backward, though you’ll have to hike upriver (which is a lot less fun). Water availability is still the most relevant planning factor, which I’ll get into below.
Note on Shuttles:
All of the best backpacking options for this hike are point-to-point, and so require either a car drop or a shuttle. We were lucky enough that Alyssa’s grandpa lives 2 hours away in St. George, so he helped us drop our truck at Lee’s Ferry and he took us to the trailhead. For those who don’t have that option (or two vehicles), there are some shuttle services you can hire that will take you from any trailhead to another. Some well-reviewed options are:
Lee’s Ferry is roughly two hours from Wire Pass, and only slightly less from Buckskin or White House trailhead. All of these trailheads are relatively close together though, so you’ll be able to save some money (around $100) by ending at one of them as opposed to finishing at Lee’s Ferry.
Maps, Water, and Camping
Paria Canyon Maps
Though it’s near impossible to get lost on this hike (just follow the river), it would be easy to miss springs and campsites, and it’s helpful to know where you are. There are two map sets I recommend.
The first is the BLM map of the area, which you can get at the BLM office when you pick up your permit. It’s a little booklet with a series of maps that’s helpful for figuring out where campsites and springs are.
The second is Todd’s Desert Maps, which also includes less-reliable springs and other waypoints. You can print these in advance at his website.
In addition to maps, having some way to track either your location or mileage is very helpful in locating springs or campsites. You can certainly do it without, but being able to check every now and then means more enjoyment and less stress over constantly being on the lookout for water. We used the GAIA GPS app and found that as long as you leave it on, it’s pretty good at knowing where you are. I downloaded basemaps and then created waypoints on top of that for things like springs and campsites, and that system worked great.
Water Availability in Paria Canyon
Water availability is arguably the most challenging part of this hike. It’s odd considering that you’re following a river, but the Paria River is silty, salty, and downstream from cattle operations, so it’s less than ideal. To drink it would require pre-filtering (through a bandana or something similar), filtering through a water filter, then purifying with tablets or a Steripen (or boiling). It would work in a pinch, but would be so time-consuming that I would definitely not recommend it.
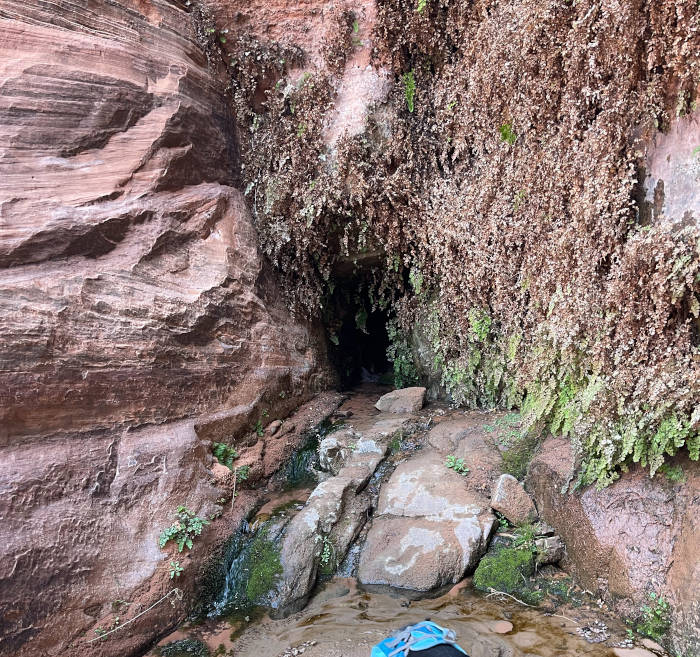
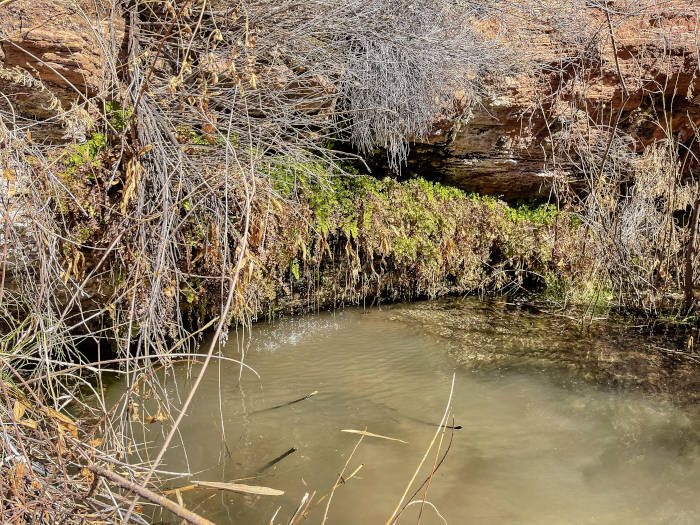
Instead, plan on using the freshwater springs that flow from the canyon walls. These are actually fairly common, and are marked by green vegetation (pictured below) growing out of cracks in the walls. The difficulty is that only three springs are reliable enough to bank on getting more than a couple of sips out of, so you’ll need to plan around these and consider other springs a bonus. The three springs are:
Big Springs - Mile 12
Located at mile 12 (starting from White House Trailhead), Big Springs is found in a crack in the right wall at a left-hand bend in the river. It’s a gusher, and we filled all our bottles in just a couple of minutes.
Shower Spring - Mile 22
Shower Spring is hidden behind some brush on the left bank of the river just before a right-hand bend. It’s completely concealed, but a use trail through the brush should show you the way. Shower Spring lives up to its name, with water springing all along a 6-8 foot long ledge into a knee-deep crystal clear pool below (the photo below makes it look mucky, but I took that after wading through it).
Last Reliable Spring - Mile 25
This spring has the weakest flow of the three, but as it’s the last one for 13 miles (if traveling to Lee’s Ferry) you’ll want to top up here. The flow that you can use to fill bottles is slightly hidden, but it’s marked by lots of the “spring vegetation” and freshwater flowing in sheets down the rocks. It’s on the left side of the river, just before a sharp left-hand bend and across the river from a very nice campsite.
There are a lot of other small springs and seeps along the way, but none reliable enough to mark the location of. Some of these are small pools near the river (which will be much clearer than the river water and flowing towards it) and others are just small trickles of water down the rock. They can be used if necessary, but in general are more of a pain than they’re worth. If you plan adequately, you should be able to get all the water you need from the three reliable springs.
Should You Filter Spring Water?
In general, I don’t filter spring water when it’s flowing directly out of the ground and downhill. There are a few springs, however, that bubble up out of the ground and form pools, and I would filter water from these (though we didn’t need to use them on this trip).
The theory is that water that can be caught flowing shortly after it leaves the ground doesn’t have any time to pick up viruses or parasites. Water that is allowed to stagnate at all is riskier. Drinking any water in the backcountry carries some risk, though, so do what feels most comfortable to you.
Paria Canyon Camping
Before I get into finding campsites, I should mention that in Paria Canyon you are required to pack out all of your own waste (you know what that means). The area is just too confined and sensitive to allow burying waste—it would quickly become a, erm... sh*t hole. Wag bags are provided when you pick up your permit, and are actually fairly easy to use (instructions are provided on the bag).
Also worth noting is that campfires are not allowed in the canyon. The reason is that allowing campfires encourages vegetation gathering, and there just isn’t enough combustible material to go around. Either bring a small lantern or plan for some early bedtimes.
Aside from those two things, camping in Paria Canyon is pretty easy. There are tons of campsites marked on the BLM map, and there are even more unmarked ones that will generally be pretty obvious. Every now and then you’ll see small sandy benches or hills next to the river, often with trees and other vegetation, that tend to be pretty flat. You can pick campsites from the maps or just hike until you find a nice one.
The BLM asks that you use pre-existing campsites at least 200 feet from the water. It’s usually easy to tell where others have camped, and even if not, there are lots of flat sandy areas that fit the bill of a “durable surface” as prescribed by Leave No Trace. Just make sure not to camp on vegetation, and especially not on the sensitive cryptobiotic soil that is commonly found in the lower canyon.
Our campsites were:
- Night 1: In Buckskin Gulch, about ¼ mile from its confluence with the Paria River (mile 13, starting from Wire Pass). It was a large, multi-benched hill with lots of grass and trees on the left side, well out of flash-flood danger.
- Night 2: On a ledge high above the river on the left side (mile XXXXX). We were on the lookout for a specific campsite (which happened to be only ¼ mile beyond us), but found a use trail up the hill to this bench instead. It had been used and was a cool, safe spot (rain was possible and there were some ominous clouds), so we set up there and didn’t regret it.
- Night 3: On the right side of the river just before the Last Reliable Spring. There was also a nice campsite directly across from the spring, but our dogs were tired (both our feet and our actual dogs), and this one was bigger and had a nice rock table for cooking dinner.
Camping next to water is great, but not always practical in Paria Canyon. It worked out that we could camp at the Last Reliable Spring on this trip, but that meant 13 miles of hiking on the last day. Just beyond the Last Reliable Spring there is a “high water route” which keeps you out of the river and makes for quick hiking, but it’s totally exposed and in the summer would be brutally hot. In hotter months I would prefer to hike beyond the Last Reliable Spring in the cooler evening hours, then finish the hike fairly early in the morning to avoid the heat of the afternoon. This would require you to carry a lot more water for your evening meals and for drinking the next day, though, so do whatever you’ll be most comfortable with.
Other Considerations
Paria Canyon Safety Hazards
Paria Canyon is generally pretty safe, but there are a few things you should be aware of when attempting to hike it.
Flash Floods
This is the biggie. Search slot canyon flash flood videos on youtube and you’ll see what I’m talking about—they’re the most dangerous aspect of any slot canyon hike. They tend to happen in monsoon season (July-September) when afternoon thunderstorms can drop inches of water in a few short hours. This water then gets funneled into drainages, and when that drainage is an 8-foot wide canyon, water can quickly rise to life-threatening levels.
The lower canyon is generally pretty safe and there are lots of high points, but Buckskin is committing. There is only one way out of Buckskin (besides the trailhead or the Paria confluence), called the Middle Out Route, at mile 13. It’s class 4 scrambling, so even that is dangerous in its own right and should be avoided.
People die just about every year in flash floods in Southern Utah, so take them seriously. Don’t hike if there is rain in the forecast, especially during monsoon season.
Quicksand
I remember that as a child, quicksand always seemed like a much bigger danger than it really is. In Paria Canyon, however, quicksand is a real thing you should be aware of. Quicksand here isn’t usually dangerous, but it can be waist-deep on an adult and is a huge pain to get out of, and thus is worth avoiding.
Quicksand usually looks like run-of-the-mill mud (of which there is a ton), but is much deeper and softer. It usually sits just outside the river’s current, where sand and water can mix to form a thin goop. If you step in it, it’ll suck you in the more you move. So be on the lookout for it, and when you realize you’re sinking more than usual, stop moving and plan your escape.
The River
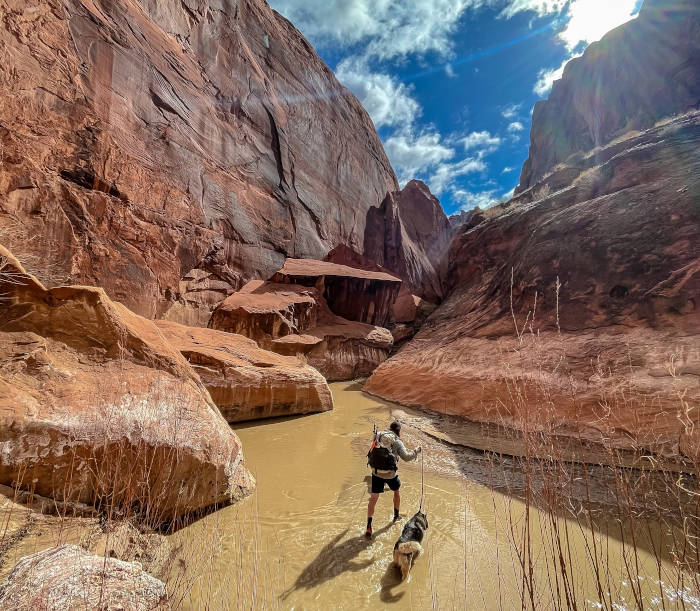
For most of its length and at most times of year, the Paria is an extremely tame river. It’s lazy, meandering, and rarely deep. After spring rains or summer storms, however, it can rise and become a little dangerous.
Most of this danger is in the lower canyon, where lower rock formations squeeze the river into a smaller, but deeper and faster-moving channel. In these areas avoid stepping next to large rocks; they can hide chest-deep holes just a few feet from ankle-deep water. Cross the river where you see it’s movement in ripples, as it’s usually shallower and the bottom is more consistent. It’s not usually dangerous, but when it comes to water it’s always better to be safe than sorry.
Wildlife
There are no large predators in Paria Canyon (except the occasional mountain lion, which is essentially a non-issue), but there are two real wildlife concerns: rattlesnakes and scorpions.
Rattlesnakes are common throughout the wilderness area, though they are most often found near the upper trailheads and in the lower canyon as it becomes wider. They can still be found anywhere along the route, though, so always practice “rattlesnake awareness.”
Rattlesnake awareness generally means watching where you step or stand, and thoroughly checking any stump, rock, or piece of ground you plan to sit on. You should also avoid prime habitat like thick brush, because snakes can be harder to hear and see. Always keep your ears open to the sound of a rattle, and move away from it if you hear one.
Scorpion safety is roughly the same. The difference with scorpions is that they are nocturnal, and like to find dark, damp, protected spots to hang out. This inevitably means that if they find your shoes, there's a good chance they'll hole up in them. Always shake out your shoes before stepping into them in the morning.
Backpacking Gear for Paria Canyon
All the usual stuff applies here, but there are a few tweaks and oddball things I would highly recommend bringing on this trip.
Trail Runners
If you don’t already hike primarily in trail runners, definitely do it here. Crossing the river constantly will weigh down boots with water, and over time that will get extremely uncomfortable. A pair of quick-drying trail runners are the way to go (I wore my trusty La Sportiva Bushido II's).
Also, for those who would consider sandals (like Chacos) instead, I recommend against them. There are a lot of other trips where they might make sense, but the muckiness of this trip would make sandals a huge pain. It would be annoying at the very least, and at worst could cause some seriously painful irritation. Oh, and the “cesspools” in Buckskin are a different kind of disgusting (rotting dead coyotes, anyone?), that I wouldn’t want to subject my bare feet to.
Neoprene Socks
If you go in the summer months these probably aren’t necessary, but when we went in March they were super valuable. NRS makes these specifically for canyoneering and they keep your feet nice and warm, just like a wetsuit would. We went with 2mm thickness (which you can get at local sporting goods stores, or on Amazon), though if you were to hike in mid-winter I’d recommend 3mm or more. I would also recommend wearing a thin wool sock underneath them, as these also insulate when wet and will keep your feet blister-free (the neoprene isn’t exactly foot-friendly).
Wide-Mouth Bottles
Since you have to fill up at springs, narrow-mouthed bottles could make your water fill-ups annoyingly slow. We use CNOC Vecto bags, which have a wide opening, but a Nalgene or similar would also work.
Camp Chair
I’m not usually a camp chair person, so we didn’t bring them on this trip. I can’t say that I would bring one next time (I just can’t stomach the weight), but if you ever find a camp chair valuable then you’ll definitely want one here. There is rarely anything to sit on except the ground, and that ground is often prickly or dusty.
Camp Shoes
I go back and forth on camp shoes, but this hike is a perfect example of where they’re useful. Your shoes and socks will be wet all day, so giving your feet an opportunity to air out before bed is a must.
Emergency Water Treatment
I’ve already recommended that you plan to rely on the springs, but should have a way to treat water from the river if necessary. Bring a bandana, a water filter, and purification tablets (or SteriPen).
GPS or Mileage Tracker
True landmarks are pretty hard to come by in the canyon, so some kind of tracker is invaluable. It will help you figure out when you should be on the lookout for springs and campsites, which are often hidden.
I used GAIA GPS on my phone, which although it was way off on mileage (being in the canyon makes your location bounce around constantly), was generally pretty good at telling us roughly where we were as long as we kept the tracking function on. You could also use something like a non-GPS Fitbit (or similar) to track mileage instead of location, which would be almost as helpful since the major springs and campsites are marked on the map with mileage reference points.
Can Dogs Hike in Paria Canyon?
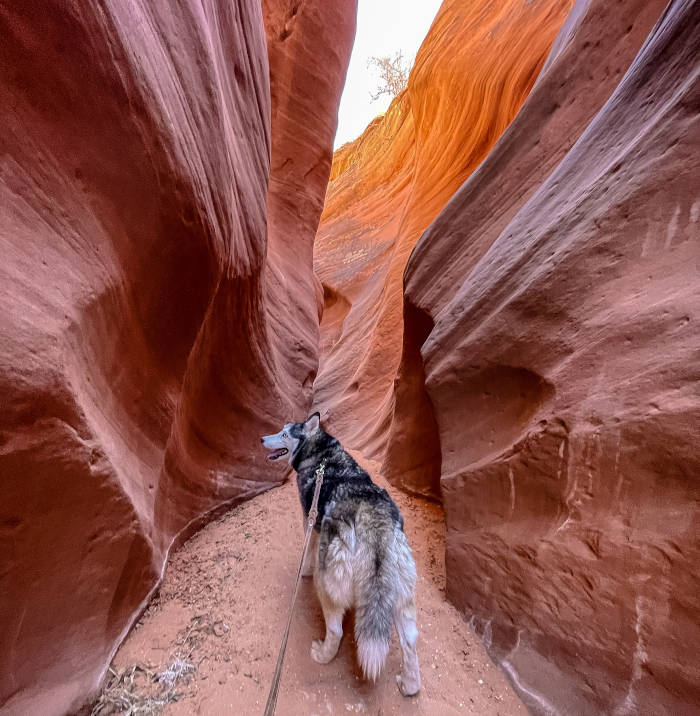
On our Paria trip we decided to take our two large dogs. Dogs make backpacking more challenging, but we usually find it to be well worth it. Our huskies are go-getters and love to be outside, and doing this in winter made it seem like a no-brainer to take them.
On this trip, however, I would recommend against bringing your dogs. There are a few reasons for that.
Reason #1: Boulder Jams
If you’re going to hike Buckskin, there are several boulder jams that are impassable for dogs. If you have a smallish dog (40lbs or less) that’s very familiar with a belay harness, you may be able to lower them down. If not, you’ll likely need two people and a way to pick up and pass your dogs down over ledges and across gaps. This is what we did, and though our dogs are pretty cooperative, it was a huge pain. The dogs didn’t like it and the last boulder jam in particular was out of my comfort zone for danger. We took our time and made it work, but I certainly wouldn’t do it again.
Reason #2: Water/Heat
This is a 2-part reason because heat exacerbates water problems. If you bring a dog you’ll need to carry a lot more water (much more than is reasonable to put in their backpack) and water use gets harder to predict. If it’s super hot out (which for us wasn’t a problem), I wouldn’t bring a dog for its safety.
Reason #3: Wetness
On this hike you’ll be in and out of the Paria River constantly, which at times is a muckfest. It’s also very silty and saline, which can be especially irritating to dogs’ feet and armpits. Our dogs did okay, but they didn’t love it. If you’re going to bring a dog, definitely bring Musher’s Secret or another form of paw wax to protect them.
Also on this point, it’s very difficult to keep your dog from drinking the river water when you’re in it all day. I normally let our dogs drink from mountain lakes and streams if they feel like it (their stomachs are a lot stronger than ours), but I’m not so comfortable with this river, especially considering it’s downstream from cattle operations. Leptospirosis is a real concern here, especially in the summer months and when the Buckskin cesspools get really nasty. Our dogs occasionally took sips and were fine, but it wasn’t fun keeping an eye on them constantly.
All in all, I wouldn’t bring our dogs here again. It’s definitely possible, and depending on your dog might make more sense for you than it did for us. But it reduced our enjoyment (where it’s usually enhanced), and for most dogs they’ll probably be better off not going.
Final Thoughts
All caveats aside, Paria Canyon is an amazing backpacking trip and well worth all the extra consideration. It’s the most unique route I’ve ever hiked and would highly recommend it to anyone looking to take a deep dive into what Southern Utah has to offer.
Any questions or concerns? Ask away in the comments!
This is a lot of great information! Might try to hit this next time my kids are hiking it!
Thanks, get on it, it’s a great hike!