The word “ultralight” is almost a bad word at this point. Head over to the subreddit r/ultralight_jerk and you’ll see what I mean; the term has been corrupted by folks who spend more time cutting handles off toothbrushes than actually backpacking (or at least that’s one way to look at it).
But that doesn’t mean those who regularly put their life in a backpack should ditch “ultralight” principles completely. and just because the word has its connotations doesn’t mean that we shouldn’t still try to hike lighter. More weight on your back still translates to more pain, soreness, and an overall less enjoyable backpacking experience.
Trying to pack lighter doesn’t have to be a bad thing, so here are some practical tips to lighten up your backpack without going overboard.
Note: As an Amazon associate I earn from qualifying purchases. If you click through one of the links on this page and make a purchase, we receive a small kickback at no extra cost to you. It helps keep us up and running and able to continue to provide great content. 🙂
1. Ditch The Stuff You Actually don't Need
I’m not going to tell you to ditch your tent, but we’ve all carried items we didn’t need at one point or another. The easiest way to cut pack weight is to get rid of this useless stuff; the key is being able to decide what’s actually useless and what isn’t.
The best way to do this is to go backpacking like normal. Then when you get home and you’re unpacking your gear, make a list of all the stuff you didn’t use. Try going without some of this stuff next time, and if you don’t miss it while you’re out there, you probably didn’t need it. And if you decide to bring an item and it ends up on the ‘didn’t use’ list a second time, that’s a surefire sign you can cut it.
The exception to this rule is, of course, emergency gear and first-aid. In an ideal world you’d never need this stuff, but it’s important to always bring it, because you never know when it might save your life. That said, if you’re carrying a 5 pound Wal-mart first-aid box, you can certainly replace it with something lighter/more effective (like Adventure Medical Kits).
2. Consolidate Your Clothing
When I first started backpacking, I didn’t know the first thing about layering (or clothing in general, for that matter). That meant that while a lot of my gear was relatively light, I would still end up with a heavy pack, bringing 10+ pounds in clothes alone. I’ve since learned that with a couple key strategies, clothing doesn’t need to be anywhere near that heavy or complicated.
The first strategy is to understand and pack for trip conditions. I used to pack as if literally any weather condition was possible, but you really only need to pack for a slightly wider range of conditions than what’s predicted. If nighttime temperatures are expected to be in the 60’s, you probably don’t need those heavyweight wool sleeping clothes. And if you’re going to be hiking in the desert, you probably don’t need a rain jacket.
The second strategy is to use functional layering. This ensures that you only bring one piece of clothing for each clothing need, and not two bulky pieces that have overlapping functions (e.g. a midweight thermal top and a fleece). Layering (while not overly complicated) really deserves it’s own post, but I’ll break it down to the absolute basics here.
- One long sleeve and one short sleeve shirt for hiking during the day (lightweight)
- One pair of shorts and one pair of pants for hiking during the day (lightweight)
- One fleece top for hiking in cool mornings or evenings (midweight)
- One insulated jacket (such as a down hoody) for sitting during cool mornings or evenings (mid-heavyweight)
- Insulated pants for sitting during cool mornings or evenings (optional, mid-heavyweight)
- Bottoms for sleeping (light-midweight, depending on temperatures)
- Top for sleeping (light-midweight, depending on temperatures)
- Underwear (2 pairs)
- Socks (merino wool, 2 pairs)
- Rain jacket (and rain pants if in an area prone to wet weather)
Sticking to this basic system (using expected conditions to guide the specific pieces you choose for each trip) will help keep clothing weight to a minimum. For more on how to do this effectively, check out Andrew Skurka’s Core 13 articles (which the above list is based on).
3. Prioritize Multi-Use Gear
Once you start looking, you can find tons of ways to utilize gear for more than just it’s intended use. And if you can use one piece of gear where you used to use two, that’s a great way to save weight. Some examples include:
- Stuffing your down jacket into your clothing stuff sack and using it as a pillow
- Using one cookpot as a pot and a mug
- Trekking poles can replace traditional tent poles to support your tent/tarp
- Using a foam sleeping pad in a frameless pack to add rigidity
- A buff or bandana can have a ton of uses; a pot holder, a beanie/hat, a washing towel, etc.
These examples are just the beginning. Learn to think outside the box and you’ll probably find more ways you can make your gear multi-purpose.
4. Be Meticulous About food Planning
Depending on the length of your trip, food will likely be the heaviest thing you bring. And because it’s so easy to accidentally over pack, it’s worth spending the extra time to dial it in. Making sure you only have what you need (plus a little extra) can often save several pounds on your back.
For this, an understanding of how calorically dense different foods are is essential. Dried fruit, for instance, has the same amount of calories as fresh fruit, but weighs less than half. To calculate caloric density, just check the nutrition label of any food item; then divide the calories in a serving by the weight of a serving (often in grams, so you may need to convert to ounces) and boom, you have your density. 110 calories per ounce is pretty good, and anything over 125 calories per ounce is plenty for backpacking.
Dehydrated meals are great for caloric density, because you add the water back in only when it’s time to cook them. There are a ton of great dehydrated food brands out there now, but I’m partial to Mountain House because I love homestyle flavors when I’m backpacking (and I ranked my favorites here).
It’s also important to know just how many calories you’ll actually need each day. That’s a whole topic of its own (that I wrote about here), but remember that for sustained hiking you’ll often need double the calories that you need while sitting at home.
5. Plan Your Hike Around Water

Water is heavy: 2.2 pounds per liter to be exact. And if you don’t plan effectively around water sources, you’ll probably end up carrying a ton of unnecessary water weight.
Before you go out, know where your water sources will be and how far you have to hike in between them. That way when you fill up you’ll only carry as much as you need to get to the next source. Just make sure to check recent trip reports or talk to the local ranger station first, because some water sources are seasonal and can’t be relied on.
Another way to reduce weight around water is to reduce the weight of your treatment system. Filtering water is necessary in most situations, but you can do way better than the foot-pump filters of the old days. Sawyer Squeeze filters are my go-to for backpacking, because they’re lightweight, cheap, and super easy to use (check out my detailed review here).
6. Get A Scale And Weigh Your Gear

Alright, so none of us want to be labeled a “gram weenie”. But weighing out your gear can show you what the lightest options actually are, and can help you decide what you really want to bring.
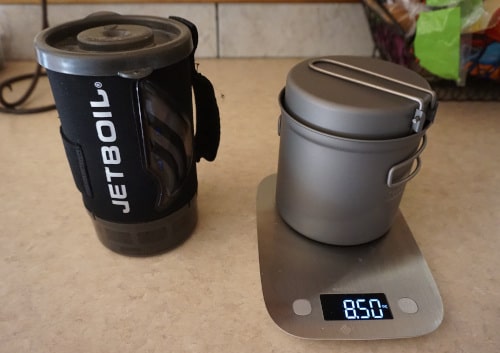
For instance, it may seem like the difference between a Jetboil and a collapsible stove/pot combo is insignificant. But my Jetboil Flash weighs 7 ounces more than my MSR PocketRocket Deluxe and TOAKS 1100 mL titanium pot weigh combined; and that pot has a frying pan lid (i.e. multi-use 😉 ). That’s almost a half pound, which is definitely worth taking into consideration. The more you use a scale (and this cheap one works just fine), the more you’ll find the places where you can realistically lighten your load.
7. Use A pack Organization Tool
Something that goes hand-in-hand with using a scale is organizing your pack. It’s pretty easy to double up on items accidentally if you don’t have an organized list, so creating one is key to keeping weight down.
For many this can be as simple as creating a spreadsheet with categories and using it as a checklist. That way when you pack for a trip, you know you’re only bringing exactly what you need. Another great free tool is Lighterpack, which allows you to input the weight of your items and calculates total weight for you. Even if you’re not into counting ounces, having a tool to help you organize your gear is extremely helpful.
Final Thoughts
My final tip is to not stress about any of this too much. In the end you’ll still be hiking with a pack, and no amount of gram counting can change the fact that it’ll be hard. But the challenge is just part of the fun, and you’ll naturally figure out how to improve over time. Keep learning, keep progressing, and above all, keep hiking.
